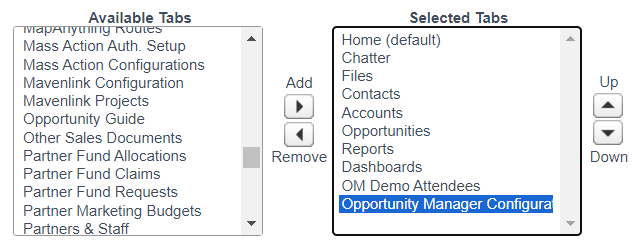
Add the Opportunity Manager® Configuration tab
-
Click the “+” at the end of the available tabs displayed

-
Click the orange “Customize My Tabs” button on the right-hand side of the page
-
Find “Opportunity Manager Configuration” within the list of available tabs
-
Select it and click “Add” in the middle
-
Click “Save”
Add Opportunity Manager Components to the Page Layout
RECOMMENDED PAGE SETUP
-
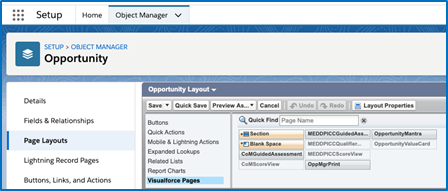
Click “Setup” in the upper navigation bar
-
Type “Page Layouts” in the “Quick Find” search bar
-
Scroll down to the “Build” section and click on “Page Layouts” underneath the “Opportunities”
-
Select the Page Layout you would like to add the Opportunity Manager Visual force pages to by clicking “Edit” to the left of the layout name
-
Looking at the layout menu at the top of the page, scroll and select “Visual force Pages” on the left-hand side
-
We recommend adding 3 sections (2 if your org only uses one of our methodologies) to the page layout by dragging and dropping “Sections” from the layout menu to your desired location within the Opportunity Record page layout. Each new section will house the below 3 components:
-
Opportunity Value Card
-
MEDDPICC Qualifier
-
Guided Assessments
-
-
Once you’ve dragged a section to the page layout, the “Section Properties” pop-up will appear. Follow the below properties setup per each of the 3 components:
-
-
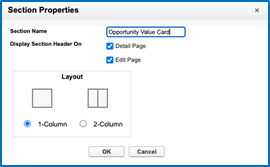
Opportunity Value Card
-
Section Name: “Opportunity Value Card”
-
Display Section Header On: Select “Detail Page” and “Edit Page”
-
Layout: Select “1-Column”
-
Then click: “OK”
-
-
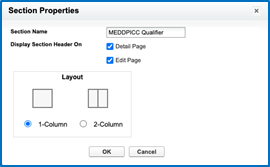
MEDDPICC Qualifier
-
Section Name: “MEDDPICC Qualifier”
-
Display Section Header On: Select “Detail Page” and “Edit Page”
-
Layout: Select “1-Column”
-
Then click:“OK”
-
-
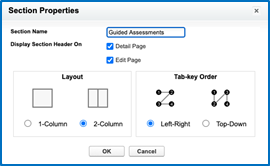
Guided Assessments
-
Section Name: “Guided Assessments”
-
Display Section Header On: Select “Detail Page” and “Edit Page”
-
Layout: Select “2-Column” if your org uses both methodologies or “1-Column” if your org uses one methodology
-
Then click: “OK”
-
-
Next, in each section you just created, drag & drop the Opportunity Manager components from the Visual force Pages menu
-
The components are:
-
Opportunity Value Card
-
MEDDPICC Qualifier
-
CoM ScoreView (Add both ScoreView components to the same section)
-
MEDDPICC ScoreView (Add both ScoreView components to the same section)
-
-
-
After adding the desired components to each section, edit each of them by clicking on the wrench icon on the right-hand side. Customize with the following settings:
-
Width (in pixels or %): Leave this at “100%”
-
Height (in pixels):
-
For the Value Card and Qualifier, set to “600”
-
For the Guided Assessments, set to “350”
-
-
Show Scrollbars: Check this box
-
Show Label: Leave this box blank
-
Then click “OK”
-
-
Click “Save” on the upper left-hand side of the screen within the components menu
-
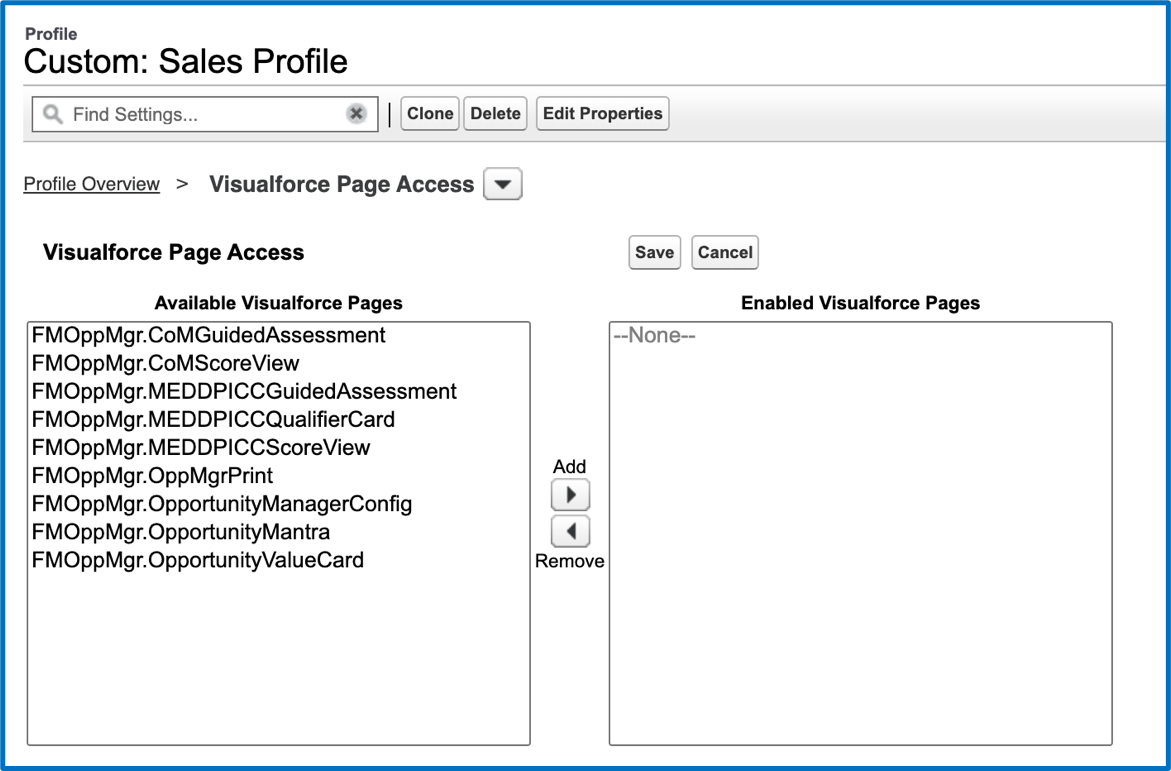
Finally, ensure that Salesforce Classic users can access the Visualforce pages on the opportunity layouts they use by updating relevant user profiles with Visual force Page Access
-
Click “Setup”.
-
Type “Profiles” in the “Quick Find” search bar
-
Click “Profiles” under “Manage Users” and select the profiles you’d like to grant Visualforce page access to
-
On the selected profile, click “Visualforce Page Access” from the top of the page and then click “Edit”
-
Add all Visual force Pages starting with FMOppMgr to the Enabled Visual force Pages
-
Click “Save”. Repeat for additional profiles as needed.
-
Move on to customize the drop-down menus within the Value Card and Qualifier by following the instructions on the Customize Drop-Down Menus page within this guide.