The Opportunity Manager allows licensed users to follow the Command of the Message and MEDDPICC methodology for a given Opportunity. Users should access this Lightning Component on an Opportunity page.
For Command of the Message, system administrators can customize the options available for the following Opportunity Value Card Fields by managing the custom Metadata associated with each:
-
Value Drivers
-
Competitors
-
Differentiators
-
Proof Points
For MEDDPICC, system administrators can customize the options available for the following MEDDPICC Qualifier by managing the custom Metadata associated with each:
-
Competitors
To edit, deactivate, or delete an existing field option:
-
Navigate to the gear icon and click “Setup”.
-
In the Quick Find box, type “Custom Metadata”. Select “Custom Metadata Types” from the menu.
-
On the row labeled Value Drivers, Differentiators, Proof Points, or Competitors click “Manage Records”.
-
Click “Edit” or “Delete” to interact with an existing option.
To add a new drop-down option:
-
Navigate to the gear icon and click “Setup”.
-
In the Quick Find box, type “Custom Metadata”. Select “Custom Metadata Types” from the menu.
-
On the row labeled Value Drivers, Competitors, Differentiators, or Proof Points click “Manage Records”.
-
Click “New”.
-
Enter required fields – hover over the question mark icon for guidance.
-
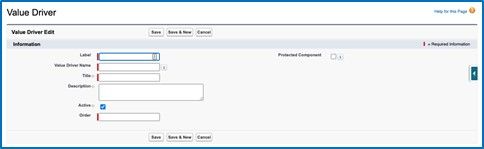
(CoM only) Value Drivers:
-
Do this for each Value Driver in your Value Framework:
-
Label: Enter a label that will help you identify the Value Driver within http://Salesforce.com .
-
Value Driver Name: This will be auto-populated from the previous field.
-
Title: Enter the actual title of the Value Driver.
-
Description: Enter (or copy and paste) the description provided in your Value Framework for this Value Driver.
-
Active: Select this checkbox to ensure this Value Driver is active.
-
Order: Use this field to determine the order you would like this Value Driver listed.
-
Click “Save”.
-
Repeat the steps above for each Value Driver in your Value Framework.
-
-
-
-
Once you’ve created each Value Driver included in your Value Framework, make sure to create one additional Value Driver Label named “Other”.
-
In the Description enter: “Insert Description”
-
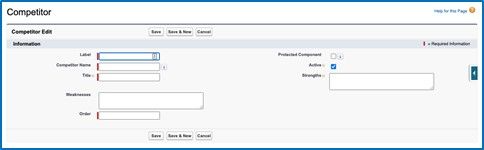
(CoM & MEDDPICC) Competitors:
-
Do this for all Competitors you’ve created supporting content for:
-
Label: Enter a label that will help you identify the Competitor within http://Salesforce.com .
-
Competitor Name: This will be auto-populated from the previous field.
-
Title: Enter the actual name of the Competitor as you would like it to appear in the drop-down list.
-
Weaknesses: Enter (or copy and paste) competitive weaknesses you would like to highlight for the seller.
-
Strengths: Enter (or copy and paste) competitive strengths you would like to highlight for the seller.
-
Active: Select this checkbox to ensure this competitor is active.
-
Order: Use this field to determine the order you would like this competitor listed.
-
Click “Save”.
-
-
Repeat the steps above for each competitor you’d like to highlight.
-
-
NOTE:
Once you’ve created each competitor, make sure to create three (3) additional competitors for:
-
“Do Nothing”
-
“Do It Internally
-
“Other”
-
(CoM only) Differentiators:
-
Do this for each Differentiator in your Value Framework:

-
Label: Enter a label that will help you identify the Differentiator within http://Salesforce.com .
-
Differentiator Name: This will be auto-populated from the previous field.
-
Title: Enter the actual title of the Differentiator.
-
Description: Enter (or copy & paste) the description provided in your Value Framework for this Differentiator.
-
Active: Select this checkbox to ensure this Differentiator is active.
-
Order: Use this field to determine the order you would like this Differentiator listed.
-
Click “Save”.
-
-
Repeat the steps above for each Differentiator in your Value Framework
Once you’ve created each Differentiator included in your Value Framework, make sure to create one additional Differentiator Label named ‘Other”.
In the Description enter: “Insert Description”
-
(CoM only) Proof Points:
-
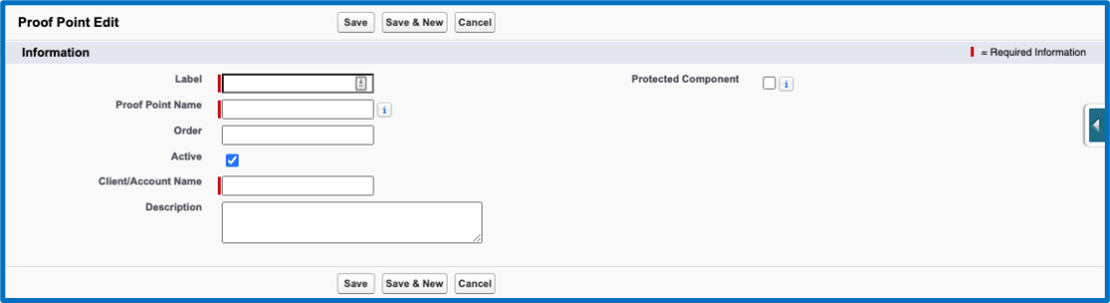
Do this for each Proof Point in your Value Framework:
-
Label: Enter a label that will help you identify Proof Point within http://Salesforce.com .
-
Proof Point Name: This will be auto-populated from the previous field.
-
Order: Use this field to determine the order you would like this Proof Point listed.
-
Active: Select this checkbox to ensure this Proof Point is active.
-
Client/Account Name: Enter the name of the Client/Account that is going to be used as the Proof Point.
-
Description: Enter (or copy & paste) the description provided in your Value Framework for this Proof Point.
-
Click “Save”.
-
-
Repeat the steps above for each Proof Point in your Value Framework.
-
Once you’ve created each Proof Point included in your Value Framework, make sure to create one additional Proof Point Label named “Other”.
In the Description enter: “Insert Description”