The Opportunity Manager Alerts Lightning Component dynamically shows alert messages when criteria are met on a particular Opportunity record. The alert messages are fully customizable and are controlled via http://Salesforce.com Custom Metadata Types.
Each alert is dependent on a checkbox formula field on the Opportunity object. To create a new alert, you must first create a new checkbox formula field on the Opportunity object when “TRUE” indicates that the alert should appear.
The Opportunity Manager app includes several standard Opportunity Formula Fields which can be leveraged when creating the required checkbox formula fields to trigger alerts. The table below identifies each of these alerts along with recommended formulas for the corresponding Opportunity Formula Fields required to trigger the alert:
|
Opportunity Forumla Field |
Description |
|---|---|
|
No Champions |
This formula returns “True” if NO Champion has been identified. This Alert applies to both the Opportunity Value Card AND MEDDPICC Qualifier. |
|
CoM Less Half Complete |
This formula returns “True” if the user has filled in LESS than half of the available fields within the Opportunity Value Card. |
|
MED Less Half Complete |
This formula returns “True” if the user has filled in LESS than half of the available fields within the MEDDPICC Qualifier. |
|
No Decision Criteria identified |
This formula returns “True” if the user has not identified the Decision Criteria within the MEDDPICC Qualifier. |
|
No Differentiators identified |
This formula returns “True” if the user has not identified any Differentiators within the Opportunity Value Card. |
|
No Economic Buyers identified |
This formula returns “True” if the user has not identified the Economic Buyer within the MEDDPICC Qualifier. |
|
No Identified Pain identified |
This formula returns “True” if the user has not identified any Identified Pain within the MEDDPICC Qualifier. |
|
No Positive Business Outcomes identified |
This formula returns “True” if the user has not identified any Positive Business Outcomes within the Opportunity Value Card. |
|
No Value Drivers identified |
This formula returns “True” if the user has not identified any Value Drivers within the Opportunity Value Card. |
To edit, deactivate, or delete existing alerts:
-
Navigate to the gear icon and click “Setup”.
-
In the Quick Find box, type “Custom Metadata”. Select “Custom Metadata Types” from the menu.
-
On the row labeled App Alert, click “Manage Records”.
-
Click “Edit” or “Delete” to interact with a particular alert.
To create a new alert:
-
Navigate to the gear icon and click “Setup”.
-
Click “Object Manager”. In the search box, type “Opportunity” and select “Opportunity”.
-
Click “Fields and Relationships”, then click “New”.
-
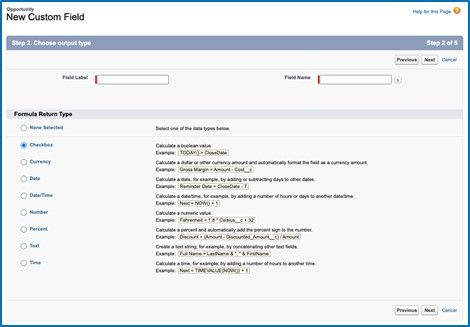
Select the Data Type for your new field as “Formula”, then click “Next”.
-
Enter a label, then select “Checkbox”, then “Next”.
-
Enter the formula that when “TRUE” indicates the alert should appear. Complete field setup and save.
💫 RECOMMENDATIONS: We recommend that you use this opportunity to customize the appropriate timing of these alert fields and when they should appear to the user.
By default, you could simply decide that you wanted an alert to appear anytime the user had not identified a Value Driver. To do this you would simply select the “No Value Driver” field from the Insert Field drop-down menu. This would enter “FMOppMgr__No_Value_Driver__c” into the formula field.
You could decide that you wanted to trigger this formula as “TRUE” only once the user has reached a certain stage in the sales process. In that case, you would still select the “No Value Driver” field from the Insert Field drop-down menu, but you would also need to add some additional criteria. For example: FMOppMgr__No_Value_Driver_Outcomes__c && OR(ISPICKVAL(StageName,'Insert Stage Name')
This would set the checkbox formula to “TRUE” if BOTH of these conditions were met.
You have the flexibility to add additional criteria to these checkbox fields in order to ensure they fit your current selling motion. Other additional fields you may want to consider including:
-
Amount
-
Close Date
-
Sales Process Stage
-
Opportunity Type
-
Next, remember or copy the API name of the new formula field. You will need this when creating the new Alert Metadata Type.
-
In the Quick Find box, type “Custom Metadata”. Select “Custom Metadata Types” from the menu.
-
On the row labeled App Alert, click “Manage Records”.
-
Click “New”.
-
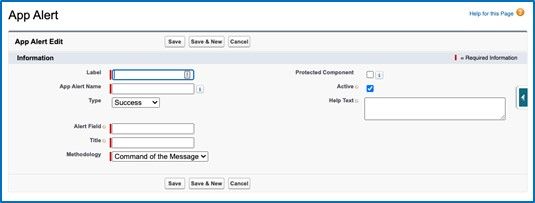
Create a Label and App Alert Name for the new alert and select a Type.
-
The Type determines the color of the alert.
-
Success = GREEN
-
Error = RED
-
Information = BLUE
-
Warning = YELLOW
-
-
In Alert Field, paste the API name of the new formula field you created.
-
Create a Title, this will be the header of the alert message
-
Enter Help Text to show users. This is the actual message that will appear under the Title.
-
Ensure that the Active box is checked.
-
Finally, indicate whether the alert should be shown for the Command of the Message or MEDDPICC methodologies, or both.
-
Click “Save”.
-
Restricting “Primary Competitor” to One Selection per Opportunity
By default, Opportunity Manager will allow for multiple selections of a “Primary Competitor” within the “Competitors” section of both the Command of the Message Value Card and the MEDDPICC Qualifier. Follow the below instructions to restrict the “Primary Competitor” selections to one per opportunity.
-
From any Opportunity, click the gear icon in the top right-hand corner of the page
-
Click “Edit Object”
-
From the left-hand side of the page, click “Fields & Relationships”
-
Click “New” on the top right-hand side of the page
-
Select “Roll-Up Summary” as the data type
-
Name the field within the “Field Label” section (ex. “Primary Competitor Restriction”)
-
The “Field Name” will auto-populate
-
-
Click “Next”
-
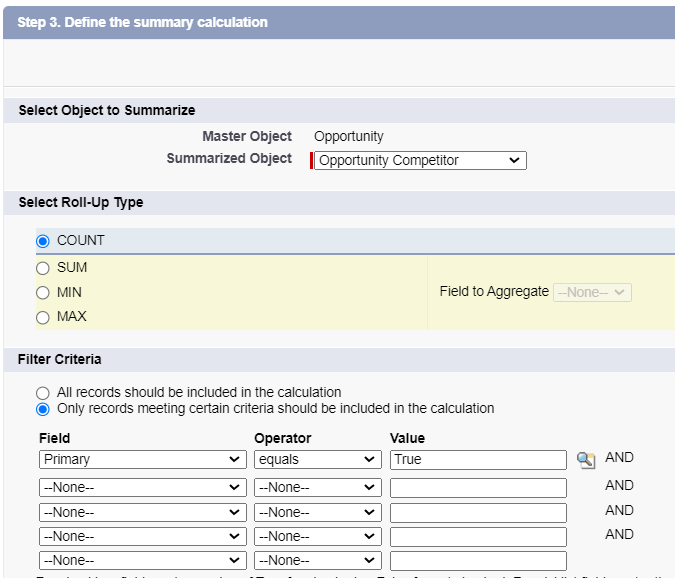
Select “Opportunity Competitor” for the “Summarized Object”
-
Select “Count” as the Roll-Up type
-
Select “Only records meeting certain criteria should be included in the calculation” under “Filter Criteria
-
Select “Primary” from the “Field” drop-down
-
Select “Equals” from the “Operator” drop-down
-
Click the magnifying glass icon next to the “Value” column and select “TRUE” from the pop-up
-
Click “Next”
-
Keep the “Visible” checkbox selected within the “Field-Level Security for Profile” menu for all profiles using Opportunity Manager
-
Click “Next”
-
Keep the “Add Field” checkbox selected next to the page layout(s) that contain Opportunity Manager
-
Click “Save”
-
Navigate back to Object Manager for the Opportunity Object
-
Click “Validation Rules”
-
Click “New” in the top right-hand corner of the page
-
Name the rule in the “Rule Name” box (ex. Primary Competitor Restriction”)
-
Make sure the “Active” button is checked
-
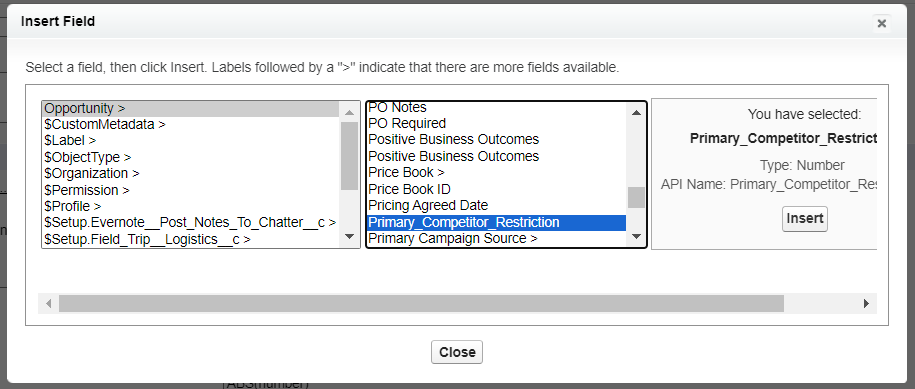
Click “Insert Field” under “Error Condition Formula”
-
Click “Opportunity” in the left-most menu of the pop-up, then click “Primary Competitor Restriction” (or the name of the roll-up field created) from the right-most menu of the pop-up
-
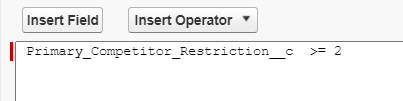
Click “Insert Operator”
-
Select “Greater Than or Equal”
-
Type the number “2” at the end of the formula
-
Enter the error message you’d like to display to users when attempting to select more than one “Primary Competitor” in the “Error Message” box
-
Click “Save”