Adding Account Planner Components
Follow the steps below to add the Account Planner components to the Account page layout in Salesforce Lightning.
Account Planner includes only one lightning component called ‘CmpAccountPlan.’ The Account Planner component is intended to be used as a main region component on the page layout.
To add the component to the page layout
-
From an Account record page, navigate to the gear icon in the top right side of the page and click ‘Edit Page’
-
Scroll to the bottom ‘Custom - Managed’ section of the components page
-
Drag and drop the ‘CmpAccountPlan’ component to the page layout to your desired setup
-
Once you have added to component to the page layout, click ‘Activate’ and select the desired App, Profile, record type, or make it Org Wide Default

Recommended Page Setup
The Account Plan component can exist anywhere on the Account page layout and it is the recommendation of Force Management to create a tab specifically to keep the component in its own separate space but that is completely up to you and your process for where you want to component to exist. To set up a new tab:
-
On the Account record, navigate to the gear icon and select ‘Edit Page’
-
Click into the main body pane of the Lightning App Builder
-
Next, click on the ‘Tabs’ component typically located in region 2 in the graphic above.
-
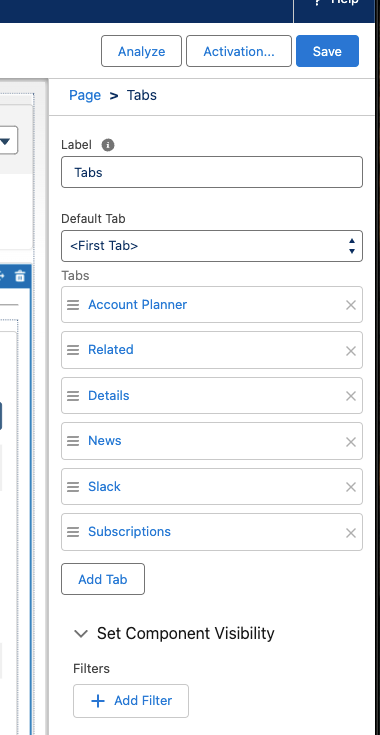
Once you’ve done this, you should see the following options (or something similar) located on the right-hand side of the window.
-
Click on the ‘Add Tab’ button. This will allow you to create a new tab which will be visible on the Account Record page. By default, the new tab will be added to the end of the list of current tabs. The name of this new tab will be dependent on what your Default tab is set to.
-
In order to rename this tab, left-click on the tab name. You will be provided with a drop-down menu to select a tab name from. Click the arrows to select from the list. At the top of the list, you should see an option for ‘Custom’. Select this, and then in the Custom Label textbox enter ‘Account Planner’. Then select ‘Done.’ You should now see the new tab listed under the Tabs section labeled ‘Account Plan’.
-
You can reposition the Account Planner tab among the existing tabs by clicking on the button and dragging the tab up or down.